Online audio editor for speech and music
Trim recordings, balance voice and music, and soften the start and end with fades. Work on the ChatCut timeline or describe the edits you want to the Agent.
Drag the handles at either edge to trim. Drop your own file to see its waveform here.






Trusted by 400,000+ creators
How it works
How to work in the online audio editor
- 01
Describe the edit and add files
Write your request on this page, open ChatCut, and sign in free. Choose My Assets → Upload → Files… and wait for the recordings to finish processing.
- 02
Arrange and balance the tracks
Drag recordings to audio tracks, move and trim clips, and select Split where needed. Adjust volume in the Inspector; use separate tracks for voice and music.
- 03
Review the mix and export
Listen across every cut and through the ending. Select Export → Audio for a sound-only file, following the audio export instructions.
Why ChatCut
What you can change in the audio editor
-
Trim and split recordings
Drag a clip edge to trim, or place the playhead and select Split. The timeline guide explains selection and ripple behavior so you can keep later clips where they belong.
-
Keep sound on separate tracks
Place dialogue, music, and effects on separate audio tracks. Adjust timing independently and mute a track when you need to hear one layer on its own.
-
Make room for the voice
Adjust audio clip volume in the Inspector and use track-level Audio ducking. Dialogue can be the anchor, with music as the follower that becomes quieter beneath it.
-
Soften a join
Add an audio cross fade from the timeline context menu when adjacent clips have enough spare source media. Review the join by listening to the words on both sides.
-
Clean up spoken delivery
Use Speech Cleanup to remove retakes, fillers, and long pauses while preserving meaning. Built-in Agent messages use credits, even when the edit uses only your recordings.
-
Reduce non-voice sound
Select speech clips and choose AI Voice Isolation to suppress surrounding non-voice sound. The noise removal feature is for dialogue and narration, not for processing music beds.
Tips
Make cleaner cuts with the audio editor
Fix speech order and timing before treating noise or balancing the mix.
-
Listen across each cut
Play from before the join after removing a phrase or pause to check that the complete thought still makes sense.
-
Choose the trim mode
Use Selection Mode when later clips must stay put, then check synchronized narration after trimming.
-
Compare isolated speech with its surroundings
Apply AI Voice Isolation to speech clips and compare nearby audio so you hear how the treatment fits the recording.
Use cases
Audio editor workflows for spoken recordings
-
Tighten podcast excerpts
Remove hesitation sounds where the delivery still feels natural. Review each cut so a useful pause or meaningful word stays in the conversation.
-
Edit retakes in a lesson
Keep the clearest complete explanation and shorten long gaps around it. Listen across the joins so the lesson flows without losing a step.
-
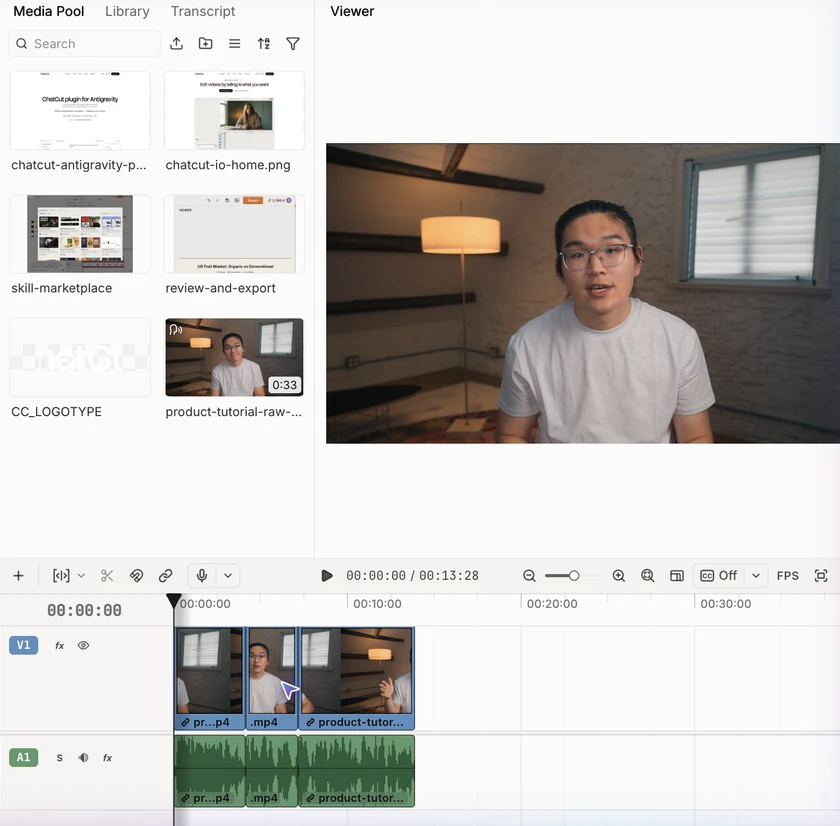
Balance a layered audio mix
Keep voice, music and effects on their own tracks so a level change touches only the layer you mean. This rough cut from our Antigravity walkthrough keeps each layer separate.
Keep editing
Keep the sound attached to the story
Continue with footage, captions, and titles after the spoken edit is settled. The ChatCut editing walkthrough shows how audio layers fit into a larger timeline. Keep your original recordings in My Assets so another version can reuse the same sources.
- Conversational editing
- Text-based editing
- Auto-captions
- Motion graphics
- AI voiceover
- Generate clips
- Noise removal
- Multi-track timeline
-
You Can Now Edit Videos with Grok Bot
Edit with Grok Bot -
How to Make 3× the Content With AI (No Editing Experience)
Turn long videos into shorts -
I Turned One Product Photo Into a Full Ad With ChatGPT
Product ads skill -
How to Create Insane Motion Graphics with Astra 6
AI motion graphics
Skills
Hundreds of skills for any video
100+ Skills. No experience needed. Start in one click.

FAQ
Audio editor FAQ
Is the audio editor free to use?
Manual timeline editing, uploads, transcription, and export do not consume credits. Built-in Agent requests and generated audio use credits, while plan permissions and export quotas can still apply. The credits policy separates those costs.
Can I edit an audio file without adding video?
Yes, import the recording into My Assets and place it on an audio track in the active timeline. Trim and arrange it there, then use Export → Audio. The media import guide explains file uploads and how assets differ from prompt attachments.
Can I shorten silences without changing the words?
Ask for Speech Cleanup and specify what must remain, along with Natural, Tight, or Relaxed pacing. The workflow reviews spoken meaning before removing retakes and compressing pauses. Play the result to check breaths and transitions before adding more layers.
How do I remove background noise?
Select one or more speech clips, right-click, and choose AI Voice Isolation. Wait for Isolating voice… to finish, then listen to the treated audio. Use Restore original audio to undo it; this treatment is intended for spoken voice rather than music or ambience.
Can I mix music beneath a voice recording?
Yes, use separate tracks and adjust the music volume so it supports the voice. Set dialogue as the ducking anchor and music as the follower when you want automatic lowering. The add music workflow explains that track setup.
Which audio formats can I download?
Web audio export produces MP3. Desktop also offers AAC saved as M4A, FLAC, and WAV in Export → Audio. Choose the correct timeline or marked range, keep the editor open during rendering, and check the resulting file.
Can I add a newly generated spoken line?
Yes, prepare the script and choose a voice, then use the narration generator. The result becomes an audio asset that you can place and trim with your other clips. Narration generation and built-in Agent messages use credits.
Do I need to upload a file on this page?
No, this page opens ChatCut with your written request. Sign in and import the recordings in the editor, where you can review them before editing. If you only need an existing video’s sound as a separate file, try video to MP3.
Related
More audio editor and voice tools
All AI apps
Audio & voice
- AI voice generator
- Audio editor
- Voice cloning
Captions, text & translation
AI video & images
All free tools
Convert & compress
Edit video
Audio & voice